Fixing a Tandon TM100 drive on a Kaypro II
It’s nice to get gifts! A month or so ago I received a tidy Kaypro II computer from a donor who had noted I was looking for such a beast. However, the computer came with no software. The owner had tossed all he had, thinking the disks were damaged due to de-magnetising from bad storage.
No software was no barrier. The Internet means that getting hold of 8-bit software is seldom a problem. Sure enough, after enquiring on the Vintage Computer Forums I was pointed to Dave Dunfield’s archive site where I managed to download disk images. In no time at all I’d produced a 5 ¼ inch Kaypro CP/M 2.2 disk on my PC using his MS-DOS imaging software.
It was then I discovered the Kaypro donor may have misdiagnosed the problem. There was probably nothing wrong with his disks. The problem seemed to lay with the A: drive, which simply refused to boot!
Was it the drive though or the new CP/M disks I’d produced on my PC? Swapping over drive A for B showed that it was indeed the drive as once done, the machine booted perfectly! However, the faulty drive (which was now B) showed the following symptoms:
- It could be formatted (mostly) and read and write data. However, any disk formatted in that drive could only be read in that drive. Conversely, a disk formatted in the good drive could not be read by the faulty one.
- Formatting was seldom 100% successful. The higher tracks (from 34 to 39) invariably showed errors when the format was being verified.
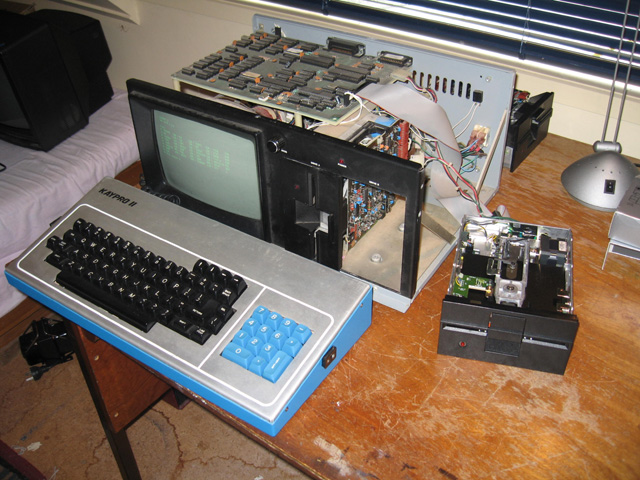
Photo 1. Kaypro hooked up to another one of my full-height drives to verify the disk controller was ok.
Apart from giving floppy drives a clean, I had little experience of fixing faults. Consequently I asked for help from my folks on the VC forum which resulted in this lengthy thread, full of helpful suggestions. Over a week or so, armed with some literature on these Tandon drives, I carried out the following tests to try to narrow the possible cause;
- Cleaned the drive rails and added a small drop of light oil. The rails were quite dirty and this made the drive much quieter. However, it still didn’t improve matters.
- Swapped both the top and back circuit board over between the drives. This made no difference so I concluded the problem was not associated with the circuitry.
- Using a florescent light checked the strobe patterns to ensure the drive was running at the right speed. Actually it was a little fast so I adjusted these. No difference to the faults however.
- Cleaned the heads ruthlessly with a cotton bud and isopropyl alcohol. No change in behaviour.
- Hooked up the drive to another machine (the System 80). It exhibited exactly the same behaviour attached to this machine. Also hooked a working full height drive from another computer to the Kaypro (see above). It worked ok. This eliminated a possible drive controller issue. It had to be the drive itself.
- Checked the screws holding the stepper mechanism to ensure they were tight. They were fine.
- Checked the spindle and assembly that turned the floppy disk. It seemed fine to me, with no obvious distortion.
By this time I reached a few conclusions. Forum wisdom was that the two problems described above (Non-transferability of disks formatted in the faulty drive and failure of the higher tracks) were unrelated. The first problem was most likely due to radial mis-alignment. The other was less clear. It could be that the heads were damaged, a condition from which there is no easy cure!
I had reached an impasse. To radially-align the heads on a drive required an oscilloscope and a special alignment disk. I had neither. Besides that, even if I did manage an alignment, there was still a possibility that the heads were damaged.
Maybe it was just better to toss this drive and seek a replacement on the auction sites?
 Enter
Philip Avery. Philip is a fellow vintage computer enthusiast with some
experience in fixing full-height Tandon drives. What’s more, he
was only 50 minutes away by car. During a visit, Philip volunteered to
take the drive away and check it out. He had an oscilloscope and although
not owning a special alignment disk, he did have some techniques available
which might help.
Enter
Philip Avery. Philip is a fellow vintage computer enthusiast with some
experience in fixing full-height Tandon drives. What’s more, he
was only 50 minutes away by car. During a visit, Philip volunteered to
take the drive away and check it out. He had an oscilloscope and although
not owning a special alignment disk, he did have some techniques available
which might help.
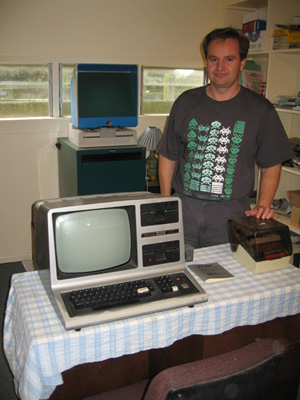
The photo opposite shows Philip with his TRS80 Model III which was crucial to the repair. I'll let him carry on the story….
Thanks Terry. I should point out that my experience with these drives is really only from keeping those in my TRS-80 Model III serviceable.
I connected Terry's drive to my TRS-80 Model III and ran Floppy Doctor, a drive diagnostic program. Immediately I noticed the drive was noisy & rough during disk rotation (despite Terry's lube job), though track stepping was fine. Floppy Doctor's digital speed read-out confirmed that Terry had adjusted the speed bang on.
I applied a drop of 3-in-1 oil to either side of the hub spindle (I didn't know if Terry had lubed these parts) and also onto the Clamp bearing. Not much improvement there. I then noticed when releasing the disk latch a little (taking the load off the Clamp bearing, but not lifting the head off the disk) - the noise practically disappeared. Holding the latch in this position I was able to format & verify the disk error free.
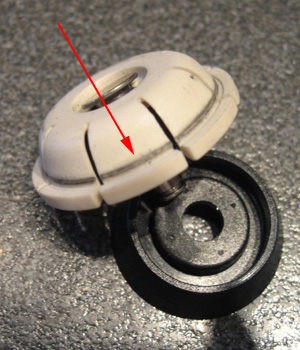 At about this time I had a 'brain recall event' - a posting from Chuck(G) on the Vintage Computer Forum highlighted a problem caused by a worn/bad Disk Clamp. On studying this Clamp, I noticed a ring of diecast metal around it where it appeared to have been 'working' in the hub (see opposite). On looking at other Tandons in my spares bin, no such ring was apparent. I elected to swap out the Clamp with one of my spares. A drop of oil was applied to the Clamp bearing during fitment and when spun up - the drive was beautifully quiet & smooth with the latch shut. I was then able to successfully write & read MFM worst-case data all over the drive with Floppy Doctor.
However the disk wasn't readable when read by my TRS-80's other drive. I suspected that the radial alignment was out, but I don't possess an Alignment disk to do the check by. Instead, I just adjust for peak signal when reading a disk formatted by a good drive, preferably the ‘other’ drive from the system under test. It’s imperative in this case to bulk erase the floppy before formatting. This avoids aligning to old, possibly mal-aligned tracks and also verifies all 40 tracks are readable, ie the drive is not ‘one track out’. To bulk erase, I simply pass a strong magnet within about 20mm of the floppy & do several passes to cover the entire surface.
I connected my scope up to Terry's drive, inserted the formatted disk (as above) and found a lousy signal. A good signal on my scope is about 0.3V peak to peak from TP1 or TP2 when reading over any given track. This I determined from measurements during past service 'sessions' with my Model III. Adjusting the Adjustment Cam, after loosening the retaining screws (as detailed in the TM100 manual) brought up a nice big signal. At this point I lock the retaining screws (only mildly tight) then step over the disk to ensure all tracks produce a decent signal. It’s worth noting that with the higher tracks (above say track 30), it is normal that there is a substantial drop-off in signal (by as much as 30%) as there is less media in those inner tracks (smaller circumference). Sometimes it takes several adjustment attempts to get an overall good signal. I then lock down those retaining screws.
The next step is to verify the drive is aligned to the given correct track. It is possible to adjust the cam to the next track, so for example you could be set-up to read track 1 to 40, not track 0-39. Using Floppy Doctor’s stepping function, I start at track 40 (one beyond the proper track count of 0-39) and ensure there is no signal (hence the need to bulk erase). I then step back to 39 which is where the first sign of signal should occur. Then continue stepping & eventually reaching track 0, ensuring there is a good signal there and that the track 0 sensor activates also.
With these steps completed on the drive under test, I could now read/write across to my other TRS-80's drive.
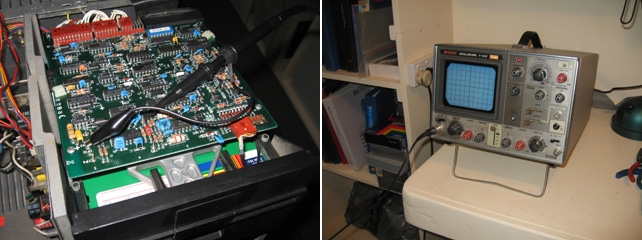
Photo 4. Probing the drive for radial alignment
All good so far. But will it work in the Kaypro II?
Terry duly swung on by & we fitted the drive back in to the Kaypro. On power up, both drives were quiet & smooth running. Disk read/writes went fine on the drive in question (drive B). We then copied the CP/M System disk to B & were able to boot from this disk in drive A. Ye ha! All fixed.
[As Terry continuously unearths more & more vintage computer equipment, I expect it only a matter of time before he comes across a 40 track alignment disk. At which time we might re-visit some of our drives & use the correct approach to alignment.]
Philip Avery
In conclusion then, the problems appear to have been:
- Radial alignment
- A noisy & faulty disk clamp with a ring of grey deposit around it. Perhaps the lumpy bearing was binding and causing the clamp to slip & work in the hub. This would also cause variations in rotational speed & explain the numerous read/write errors received.
This exercise has shown me that most of these problems are fixable, given the right equipment and some tenacity. All kudos to Philip, and the guys on the VC Forum. Thanks to them the Kaypro II is now a complete working unit!
Tez (Terry)
Original article - 18th January, 2009
More detail on Philip Avery's methodolgy added - 28th August, 2009