Blowing up and then fixing a Commodore 64
This blog entry is retrospective as this repair was done about a year ago. It's worth noting down though.
Think back when you were a kid. Remember that time you got a new toy that you LOVED only to accidentally break it a few hours later?? Well, not withstanding that it's 45 years or so down the track, I can still relate to that feeling!
The Commodore 64 is a classic machine which somehow I avoided owning until about 1991. I bought it more for curiosity value then, and sold it in a garage sale for about $10 in 1997.
That was before I was collecting microcomputers.
I decided I had to re-acquire one to add to my growing collection. Being a home computer, many of C-64s I saw for sale had been knocked around but I finally found one in pristine condition. No sign of yellowing, scuff marks or anything which indicated this machine had inhabited the dark recesses of a kid's toy box or teenage bedroom.
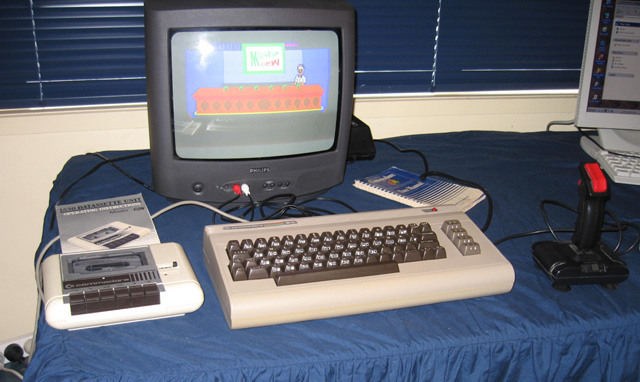
Figure 1. A lovely Commodore 64
Fantastic! I spent an evening playing Ghostbusters, Commando and several other games of days past. Ah, the memories! However, towards the end of the evening something happened. I'd just swapped around a joystick and suddenly, a section of the keyboard stopped working? Whaaat??
Hmm ..weird. A number of the keys just didn't respond? At this stage it was midnight, so I went to bed hoping that the problem might mysteriously fix itself over night.
Of course, it didn't.
Eventually I resigned myself to the fact that my brand new (-looking) Commodore 64 was now broken! Grrrr....
Ok, so what was wrong? The first thought was the keyboard. I had a Vic-20 which had a compatible keyboard so I tried that in the C-64. No difference.
Time for serious research. Googling around I discovered that a faulty keyboard, particularly if the non-working keys conformed to a particular pattern compatible with the bit-mapping matrix, was a indication of a damaged 6526 complex interface ADP chip. Sure enough, my non-working keys seem to fit this pattern as it was the Ins/Del, 3, 5, 7, 9, +. $ and 1 keys that had failed! Bugger!
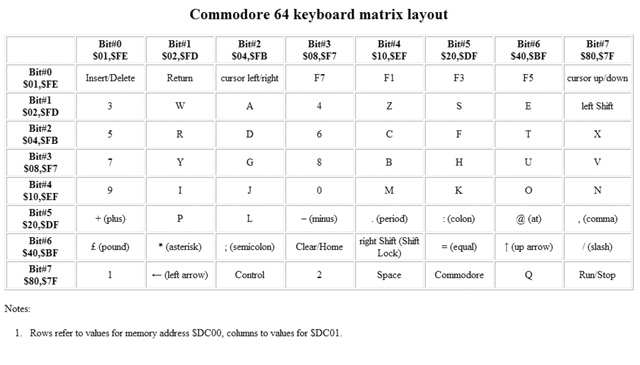
Figure 2. Keyboard matrix
So, the options were to get a couple of new ICs (there are two of these 6526 CI-ADP chips in the C-64) or get hold on another C-64. Scruffy, beaten up but working C-64's are reasonably common so I elected for the latter and got a yellowed unit off an auction site for a few bucks. The PCB board from this machine was in poorer condition compared to the first C-64 so rather than simply swapping the boards, I elected to swap one or both of the CI-ADPs from this one to the pristine unit. More than that though, I wanted the experience and satisfaction of replacing an IC.
This was a challenge. The ICs weren't socketed and they were large. I'd never desoldered an IC before that I wanted to use elsewhere. Before I tacked the job, I practiced desoldering a couple of ICs on some junk PC cards. This was really good practice. The first attempt was an abortion, but I improved and started to get the hang of it. I found solder wick was great for soaking up the solder around the pins. Eventually I could remove all of it, and the IC would pop out will some light pressure from a screwdriver placed underneath it. In one or two practice attempts I hadn't removed quite enough solder and one or two IC legs broke off when I did this. ALL of the solder has to be removed or you risk damaging the IC.
Ok, having developed some skills I then tackled the real thing. As there are two of these ICs I hoped the first one I'd replace was going to be the faulty component. There was no way to know which one it was until I'd swapped it over.
Removing the working IC from the donor C-64 was painstaking and exacting work. The IC has 40 pins! I was conscious that I had to be careful and not overheat the IC. I didn't want to damage the circuitboard of the donor C-64 either. You never know when you might need a spare.
Eventually the job was done. Removing the old IC from the faulty C-64 was easier, as I simply snipped it off then removed the pins separately. However, even this was time-consuming and I had to take care to not damage the board. After doing this, I dropped a socket into the holes then plugged in the replacement IC.
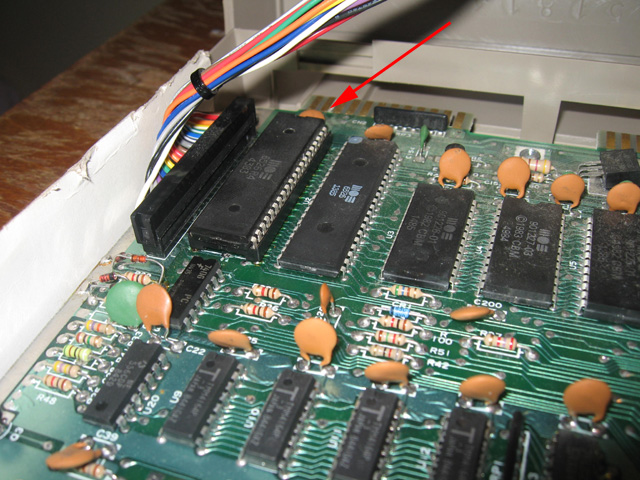
Figure 3. Replaced IC (in socket)
Would it work? Had I managed to extract and transfer the IC in an undamaged state? Was it even this chip that was causing the problem?
Flipping the switch revealed the READY prompt. And all the keys worked! Yay!
So, a successful fix and some experience in desoldered a working IC. My new toy was back to it's old self.
Whilst doing some research into the fault I discovered that the 6526 CI-ADP chips can be damaged easily by static electricity from a finger on the exposed joystick port. It's directly connected to those pins. I figured this is what happened. In fact I remember touching the port before plugging in the joystick. It's very easy to do accidentally anyway, as the ports are right next to the power switch!

Figure 4. Exposed Commodore 64 joystick ports. Easy to touch when turning on the power
In fact, I would call it a design flaw!
Anyway, it's all good now.
Tez
14th February, 2009