Modifying a Dallas DS 1287 battery/real-time clock in a Compaq SLT/286 Portable Computer
 Introduction
My Compaq SLT/286 portable/laptop computer is a cute little number, about the size of a lunchbox. With its detachable keyboard and grayscale VGA graphics it would have been a lovely executive toy back in 1988 when released.
Problem with my unit (and now probably most out there) was that it couldn't keep its CMOS configuration due to a flat battery/real-time clock. This issue manifested itself by preventing the computer figuring out what type of floppy disk drive it had. The machine could boot off the hard drive, but the A: drive could not be used and it threw up that annoying "configuration not set" error message at every boot.
Now, I like ALL my computers to be working properly. Time to see if I could fix it.
The DS 1287 in the SLT/286
The combination Dallas DS 1287 battery/clock was used in many computers in the late 1980s and consists of a battery and RTC circuitry sealed in a square plastic block with pins, so it can be plugged into the circuit board (Photo 1).
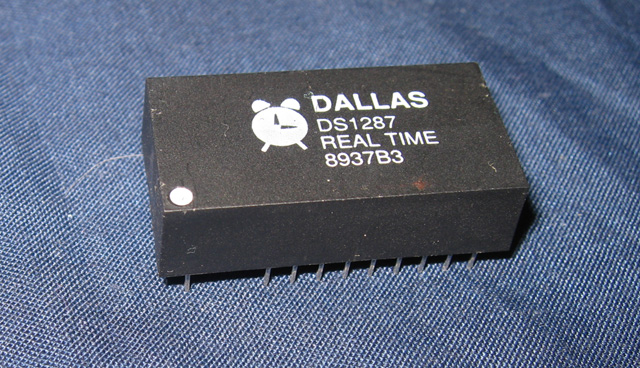
Photo 1. Dallas CMOS battery and Real-time clock
On most machines this means plugging the chip into a SOCKET which is fitted on the motherboard.
Not so the SLT/286. Now, having to replace the whole chip (now no longer made) is bad enough but in what seems one of the best (worst!) examples of planned redundancy ever, Compaq SOLDERED this IC-type part onto the board making it impossible to replace when the battery part of it eventually ran out!
There is a surgical procedure that can be applied to the Dallas chip that allows an external battery to be fitted. This was successfully carried out on my IBM PS/2-286. However, the Dallas chip was socketed in the IBM and I undertook the cutting and soldering on the chip when it was out of the board. There was no way I was going to attempt to desolder the chip on the SLT/286. There are many fine tracks and surface mount components. It was just too risky!
I considered modifying the chip in situ i.e. while it was still on the main board. This was also risky as one slip of the knife and tracks may be damaged. However, I was encouraged by two members (Nige the Hippy and QuantumII) of the Vintage Computer Forums who had done this "on-board" hack successfully. In particular, Nige the Hippy had wired in a shrink-wrapped button cell and had nestled it among the components on the mainboard, where it seem to fit quite snugly between the latter and the top casing. This out-of-sight mod seemed to be the ideal solution.
After waiting a few days to pluck up courage, I had a go at duplicating Nige's modification on my own SLT/286 Dallas battery.
Cracking open the case
Actually getting to the Dallas chip on these machines is an adventure in itself! So much so that I've documented this process in a separate blog entry. Eventually I had the mainboard free, and proceeded to start work on the Dallas chip itself.
Exposing the contacts
I carefully scraped away at the chip with a small knife. I proceeded very very slowly and cautiously, starting at the top edge and slowly working down. It was painstaking, slow work, under jeweler's goggles so I could get a magnified view of what I was doing. At the end of two hours, the hidden pins were exposed. I broke the connection between the -ve end of the embedded battery and the reversed, now-exposed pin. The two contacts were now ready for soldering.

Photo 2. Contacts now exposed on the Dallas chip
I used my soldering kit to carefully solder on a couple of wires which terminated on a socket. I then made up a replacement 3v cell the same way Nige had i.e. soldered a wire each on a small piece of aluminum foil, placed these either side of the button battery and heat shrunk the whole arrangement. The wires from the battery terminated in a small plug, which I plugged into a socket connected to the wires from the chip (Photo 3). Note: Over time this method of holding the battery proved rather unreliable. See the update below for an alternative way.

Photo 3. External battery mod for the SLT/286 Dallas chip
Uh oh..problems!
I felt quite pleased when I'd finished. I couldn't think of any reason why this wouldn't work. I reassembled the machine, inserted the power cord and switched it on.
Nothing happened!
The machine refused to fire at all. Grim thoughts started to loom on the horizon along the lines of a static electricity zap from one of my fingers . However I wasn't ready to panic just yet.
Easy fix
I took the machine apart again. A close inspection of the motherboard revealed no scratches or signs of damage. Hmm. I tested the battery from the terminals on the battery plug. They read 3v. I tested the voltage on the Dallas chip itself where the leads were attached. Zero volts.
Zero volts! Huh!??
On closer inspection, I discovered that the pins in the socket had been pushed back when the plug was inserted and they were not mated properly with it. After making sure they were I did another voltage test. This time, the 3v from the battery was making it through to the chip.
I reassembled (again) hoping that was the problem.
It was!!! The machine booted, and using the reference disk I reset CMOS. I rebooted and viola! No error message, and the A: drive was now fully operational!
Fixed!

Photo 4. My fully-operational Compaq SLT/286
I'm pleased with this mod. It took a lot of patience and care but it works like a charm. What's more, when the battery runs down in a few more years time, a replacement will be mean simply wiring up a new cell arrangement.
Many thanks to Nige the Hippy and QuantumII for giving me the encouragement to tackle the problem, and Nige for providing a design to work to.
Update: I recently dragged me machine out and found it had lost it's CMOS info. What the??!!. I checked and found the leads and foil under the heatshrink weren't making contact with the battery properly. I replaced with a proper button cell holder, with the wires soldered to its connections and wrapped the whole unit in insulating tape. It's still fits nicely next to the Dallas chip and works well. This battery arrangement should be more reliable.
Tez
6th December, 2009
Updated, 19th March, 2011