Faulty RAM traced to power supply in an Atari 800XL
Introduction
I'm always on the lookout for cheap, beaten-up doubles of my existing collection to use as a source of spare parts. A few months ago I acquired a second Atari 800XL for just such a purpose. Problem is, broken units just beg to be fixed! This article describes an Atari 800XL resurrection, and the cause of death in the first place.
The acquisition
Here's what I bought. One slightly battered cheese-yellow Atari 800XL with power supply. (Figure 1)
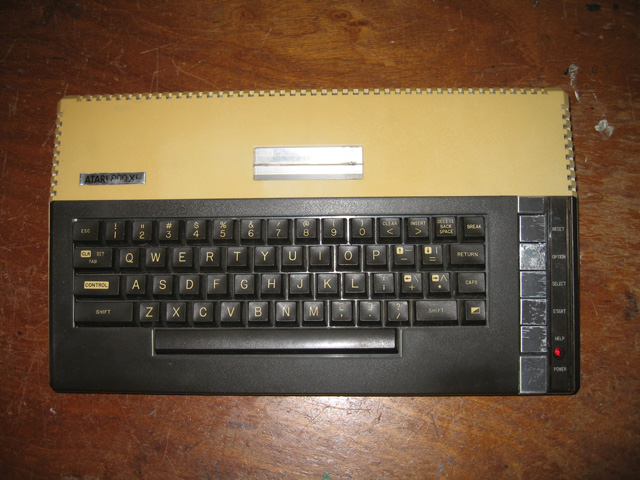
Figure 1. Cheese-yellow Atari 800XL
The seller claimed the power supply didn't work, and they were right. However, as this was a second machine I did have a working power supply. I plugged this in to see what would happen.
Faulty RAM repair
One nice thing about the Atari 800XL is that the power-up routine is partly diagnostic. A check is made of RAM and ROM and if there appears to be issues, the computer lets you know about it. This machine told me there was a faulty RAM chip somewhere similar to that shown in Figure 2.

Figure 2. Atari RAM test showing a RAM error (borrowed from the URL above)
The Atari uses little bars to represent the RAM locations as they are checked. I wasn't sure how these mapped to an actual IC so I used the old "RAM piggyback trick" to see if I could see where the fault lay (Figure 3). This worked and I soon identified the misbehaving IC.

Figure 3. Piggy-back test which helped identify the faulty RAM IC
One problem though. The DRAM ICs used in this Atari were 4264s. The only supply I had were 4164s. Were they compatible? A discussion on the Vintage Computer Forums (VCF) suggested they were, so I desoldered and replaced with these chips. Success! The machine booted to READY and seemed just fine. I played a few games to verify this was the case. No worries!
Faulty RAM repair (Again!)
Now that the machine was working, I thought I'd check the supposedly broken power supply that came with it again. I plugged it in. Nothing! No video. The machine seemed completely dead. It seems that the seller was right. The PSU was faulty. I checked the voltages and found 7.6V instead of the 5V it should have been spitting out. It was not THAT far away from what it was suppose to be but enough maybe?
Well, at least I had one good power supply. I plugged in the machine back into the good PSU and switched it on. What the?? Something was definitely wrong here. Up came a similar RAM error to the one I got before I replaced the chip?
More diagnostics showed ANOTHER RAM chip had blown! This one was right next to the one I'd replaced?
Killer PSU
My conclusion, formulated by conversations with knowledgeable folks on the VCF, was that the overvoltage on the faulty PSU was blowing RAM chips. It was lethal! This was probably why the machine had a blown RAM chip in the first place!
The power pack was for 220V rather than the 240V we have here in New Zealand but the general consensus of opinion on the VCF was that this wouldn't cause the overvoltage. I contemplated trying to fix the PSU. It was probably only a regulator that maybe I could replace. However, it was one of those completely sealed units. I did attempt a break in, but everything was embedded in green cheese-like goo (Figure 4). Yuck!

Figure 4. Inside the Atari 800XL power pack
I decided fixing this PSU was a lost cause. I did snip off the lead which went from the pack into the Atari though. I figure sometime in the future I might be able to wire this up to a simple Wall-wart type pack, and hence give this 800XL its own power adaptor.
Retr0brighting
I replaced the second blown RAM chip but I wasn't done with this machine yet. Having fixed the machine and identified the cause of the RAM blowouts, this computer was 1/2 way towards restoration. I was de-yellowing a Dick Smith System 80 at the time, so why not do this case as well. The result would be a working, clean and restored Atari 800XL unit, I may be able to sell, or perhaps experiment on.
The de-yellowing went really well. Figure 5 shows the before and after result.
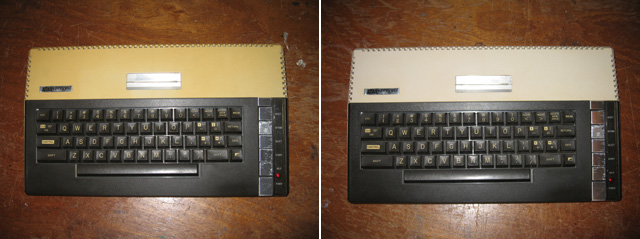
Figure 5. De-yellowing result - Before and after
Reflections
It was interesting to find out that a relatively small increase in voltage could have such a damaging effect on this computer. In fact, the importance of correct voltage has been reinforced in another repair I've just done on a Dick Smith System 80. I now know that DRAM (and in fact all ICs) have a fairly narrow tolerance range when it comes to voltages. Too much juice and they die. This was a regulated power supply so it should have been sending out 5V or something very close.
So, I now have a reasonable-looking, working Atari 800XL albeit minus it's own power pack. You might notice it has a fairly scruffy label. It actually came with a good one. I swapped the unblemished one it had with the faded one on my collection showpiece computer. My main Atari 800XL now looks great at this one's expense.
But that's what parts-machines are suppose to be for, right?
Tez
29th August, 2010