A System 80 bought back from the dead and ROMDOS/80 explained
Many System 80 enthusiasts were a true hardware hackers. Garry Howarth (Gazza) is one such example. Recently Garry repaired his System 80 and also revitalised a piece of firmware he designed and built himself. This was ROMDOS/80, a hacked (improved!) version of NEWDOS/80 in an EPROM.
Here is Garry's account (in his own words) of the recent System 80 repair and an explanation of what ROMDOS was all about.
Having done a restoration of an old MG many years ago, I know what to expect when working on vintage equipment. Frustration, a feeling of hopelessness interlaced with tears, tantrums and much consumption of alcohol. Still it's been an interesting exercise, getting this old computer up and running after it sat in the junk pile for over 15 years. Dead keyboard, corroded and broken connectors and sockets, A PSU that went up in a cloud of smoke, dead Percom, dead insects and the list goes on.
The 2 keyboards responded to a bit (lots) of contact cleaner, the same with the various sockets and connectors. The broken ribbon cables were repaired and the old beast given a general clean-up. Then came the big moment, switched her on and was greeted with something I haven't seen in over 15 years - Ready
Great, she's a goer, the image is a bit shakey but she works. A big pat on the back for a job well done.
But what is that smell and why is the room filling up with smoke?
sigh!
Replaced the smoking ruins of what used to be the power supply with one I found in the junk pile and tried again. A quick check with the CRO and all looks good. A bit of noise but zero ripple and a rock steady image on the monitor.
The expansion unit was given the same treatment as the computer and a quick once over with the CRO.
Connected the drives and tried again.
The motors start and the drive lights come on but no head activity. I removed the cover from the drives to find one of the edge connectors half off.
Both the 1771 and 1791 controllers are toast.
sigh - is this ever going to end?
Back into the junk pile and I scored a spare 1771.
Try again - and a sound I haven't heard in over 15 years - the clunk, clunk,clunk of the heads moving.
A 1791 controller was found on ebay and we now have a fully functioning Percom Doubler.
All 4 drives were given a complete overhaul and are now running perfectly
After a lot of hard work it's finished and working as good as - or close to it.
128k of memory all running at the fantastic speed of 3.6Mhz
2 * 80 trk DSDD Teacs
1 * 40 trk DSDD Tandon
1 * 40 trk DSDD MPI
A switch to make any drive become drive '0'
A printer buffer built from a kit designed by Don McKenzie from Melbourne.
A Votrax SC-01A Speech Synthesizer
An old Epson LX-850 9 pin dot-matrix printer
Joystick port, amplifier and speaker
Nokia 1200/2400 Modem and a fire extinguisher.
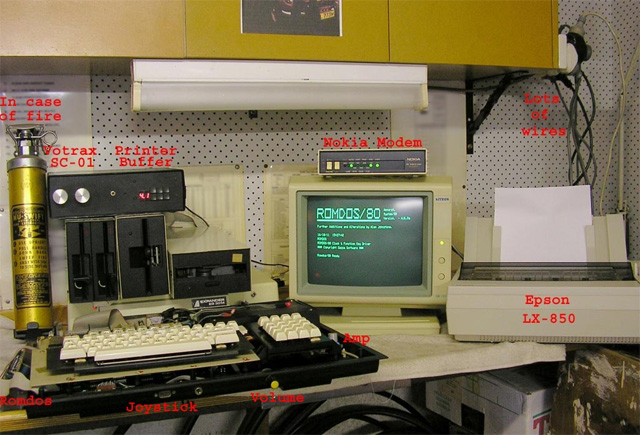
Figure 1a. The complete setup
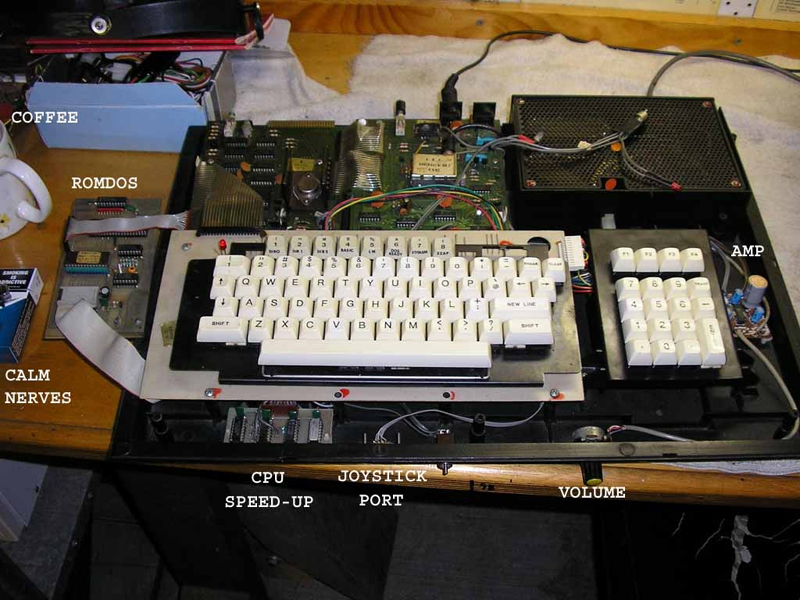
Figure 1b. Extreme mods!
Having got the computer working we can now try and nut out this Romdos thing.
All of this was done nearly a 1/4 of a century ago, some of my notes, source code, diagrams etc have been lost, some of it survives, so a lot of what follows is from my fading memory and may not be 100% correct.
Firstly, what is Romdos/80 and what does it do?
Romdos is Newdos/80 stored in a 27512 eprom. This allows the computer to boot from either a system or data disk. This frees-up drive 0 for more important things, like playing games. We now have a System 80 with 5 drives The only problem is that this extra drive only has 64k of memory and the data can't be changed without a UV light and an eprom burner. The joys of ancient technology.
All requests for system files are redirected to the Romdos driver which then transfers the system file from the eprom to it's correct place in the dos overlay area. Romdos also includes an RTC based on a National 58274
Version 1 of the Romdos/80 board was started in early 1988. This version included rom based Newdos/80, a real time clock calendar with battery backup and a CPU turbo, which, if my notes are accurate was designed by Stephan Keller and Chris Tinney of Sydtrug. Port addressing was done with dip switches.
In mid 1988 I designed version 2 of the Romdos/80 board. A simplified version of the previous board. No CPU turbo and fixed port addressing. The CPU turbo was built on it's own board mounted at the front of the computer.
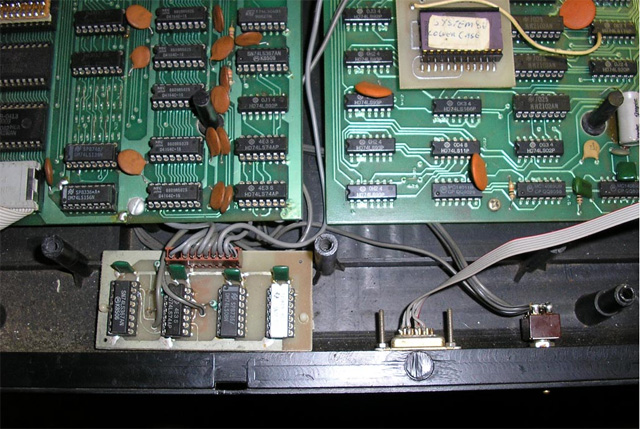
Figure 2. CPU turbo board
Both of the earlier versions still required booting from a system disk and the driver was loaded into HIMEM with the AUTO command. The driver then took control and all system files were then loaded from the eprom. The computer could now be run without a system disk. The driver was self-relocating, self-protecting and in the first version would search through a range of port addresses until it found the board. If the board was disconnected the computer would operate normally.
The final version, V3, appeared in early 1989. This board is based on an 8255 PPI. This final version includes a fully patched version of Newdos/80 with mods written by Alan Johnstone, some mods by Jack Decker and possibly others, an RTC and drivers for 8 additional function keys (16 with the shift key) and what seems to be a programme to send control codes to the printer. Still trying to work that one out. With Romdos V.3 the computer can now be booted from a data disk.
This is the Romdos board after I cleaned off 15 years worth of dust, dirt and dead spiders.
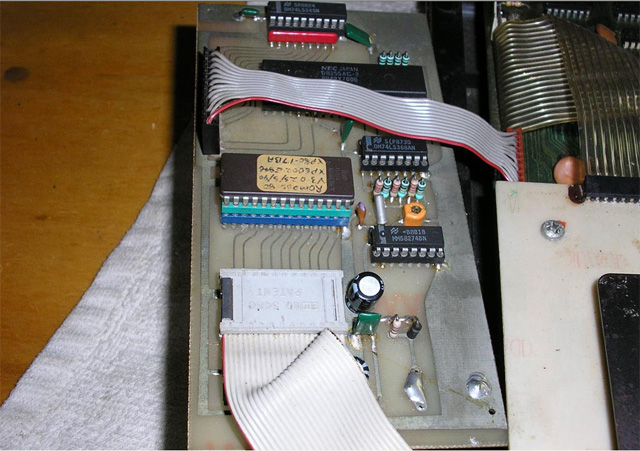
Figure 3. ROMDOS board
The 8255 divides the 27512 into 32 * 2k blocks, mapped at 3000H. Block '0' contains the drivers and the remaining 2K blocks contain the system files. The 8255 also controls the 58274 RTC.
ROM 'A' on the CPU board also has to be patched. Problem, where to put the patches. After the 'Ready' message there is a series of carriage returns. By removing these carriage returns I had just enough space for my patches.
After nearly 25 years I was having trouble remembering how the System 80's roms worked until I found a copy of TRSDOS 2.3 Decoded. This book has a good description of how the boot sector is loaded. After reading this chapter, all is now clear - I have seen the light.
After loading the boot sector the computer would normally jump to 4200H and continue loading DOS from floppy. Not any more. It now jumps to my patch in ROM 'A'
On reset the rom will load the boot sector, it then attempts to switch the eprom to bank '0' and checks to see if it is connected, if not, it will continue to boot from floppy. It then does a few other checks. If the disk is not a Newdos80 disk or if the space bar is held down it will boot from floppy as per normal.
Having ticked all the correct boxes it jumps to 3000H, transfers the driver from the eprom to himem, passes control to the driver, switches the eprom to block '1' and transfers SYS0/SYS from the eprom to ram.
Because SYS0/SYS is larger then 2k the eprom is switched to the next block and loading is continued until the complete file is transferred. The same applies to SYS6/SYS. All other system files can be transferred in one go.
The start of each block holds the number of bytes to be moved and the destination address in ram. These are loaded into the BC and DE register pairs and the LDIR command is used to transfer the data from the eprom to ram.
When SYS0/SYS has finished loading, the eprom is reset to block '0' and the time and date are read from the 58274 and stored in the proper DD/MM/YY format. Control is then passed to SYS0/SYS and the remainder of Dos is loaded from the eprom.
The system file loader has been patched and all requests for system files are now sent to the driver. On entry the HL register holds the required system file number and using this the driver calculates the correct block number, switches the eprom to that block and transfers the required system file to the overlay area in ram. It then resets the eprom to block '0' and passes control back to Dos.
The computer will still use the System and Pdrive parameters on the data disk. So they can still be set in the usual way.
Other Programmes
The file ROMDOS/CMD can be loaded via the AUTO command. This programme will exit to Dos with an error message if the Romdos driver has not been loaded.
Booting with the Space Bar held down will force a boot from floppy and will not load the driver.
If all is OK, the programme will then tie the function keys and clock onto the interrupt chain.
Any programme or process that switches off the interrupts can cause the clock to lose time. This programme should allow Dos to maintain perfect time.
The Romdos board also includes a programme to send control codes and text to the printer. A poor man's word processor. This one had me running around in ever decreasing circles.
I could see how it worked but couldn't nut out how to access it. What's the point of having it sitting in the eprom if I can't get to it?
After examining the code I found a call to 4461H. The Newdos manual calls this the *name routine enqueue. and after more looking through memory I found the word - PRN
I'd completely forgotten about the Newdos *name routine enqueue.
I typed in *PRN and up popped the printer menu - as easy as. Gave myself an uppercut.
*PRN is now a valid Dos command that can be used from the command line, Mini-Dos, Basic or within any programme that allows Dos commands.
After loading, ROMDOS/CMD requires no user memory. It uses routines stored in the eprom and memory that was used by the now redundant system file loader.
CLK/CMD or CLK/BAS are used to set the time and date of the RTC.
Both are quick and dirty but they do the job.
CLK/BAS MUST be run with the Romdos drivers disabled. This programme takes full control of the 8255 and if Basic needs to load a system file from the eprom - and it will - it wont be able to find it, resulting in a lock-up.
Romdos/80 was just an exercise to teach myself electronic design, construction and programming. Many, many hours were spent with my head buried in books and source code trying to nut out the System 80's roms and the inner working of Newdos. Most of it now forgotten.
Way back then we didn't have the use of PCB design programmes with auto routing, so the double sided PCB was initially laid out on grid paper and the final artwork was done with Bishop Graphics self-adhesive tapes and pads on transparent plastic. Exposed under UV light and etched with ferric chloride. The hard part was keeping both sides perfectly aligned but in the end it all worked out OK.
Over 20 years later and I'm still trying to get the ferric chloride stains off my fingers.
Today, with compact flash, USB memory, floppy emulators etc. the old Romdos is looking like a real dinosaur, but it did what was asked of it and over 20 years later is still working perfectly. It even has it's original battery.
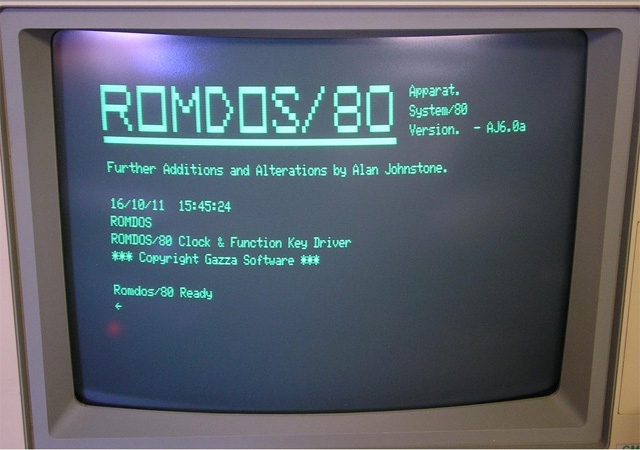
Figure 4. ROMDOS/80 at boot
and that as they say is that - Romdos Explained - or the basics of it.
What's next?
Unfortunately it takes up far too much bench space, so it looks like it'll be stored away for another 15 years, when I'll have to go through this whole process again.
I should also give a thank you to Glen McDiarmid, even though he doesn't know it, his excellent programme Macasmon was a huge help in getting this project going.
and...just when I thought the old beast was running perfectly, it started suffering from random reboots. (sigh!). Found the problem though. A faulty socket!
It never ends.
Gazza
Added to the site 30th October, 2011