Diagnosing faulty Commodore PET ROMS.
When does enthusiasm turn to obsession? Probably when one takes the diagnostic process far further than it really needs to go!
Having replaced the CPU board in the Commodore PET and largely diagnosed the original faulty board, one would have expected that to be that. End of project. However, I was curious as to WHICH ROM was actually faulty? After all there were five of these ICs and if I was ever going to sell, or use the CPU board for another unit, I really should find out which one was damaged.
So how could I check the ROM contents and identify the offending IC? One way is to use a PET running the same version of BASIC (BASIC 4.0). I could then chip substitute. If the computer failed after the substitution I would know it was that particular IC. Unfortunately, my working PET had BASIC 2.0 and that ROM set was incompatible with BASIC 4.0 ROMS. That particular option then was out.
Alternatively, I could use an EPROM reader? This would read the contents and I could compare them with known "good copies" of the ROM contents and see how they match up. However I didn't own an EPROM reader. )-:
Where there is a will there is always a way. Here is the solution I came up with. Although somewhat convoluted, it worked!
1. Getting the faulty ROM data
I did have a working PET which had spare (empty) ROM sockets. These are the white unoccupied sockets in the photo below.
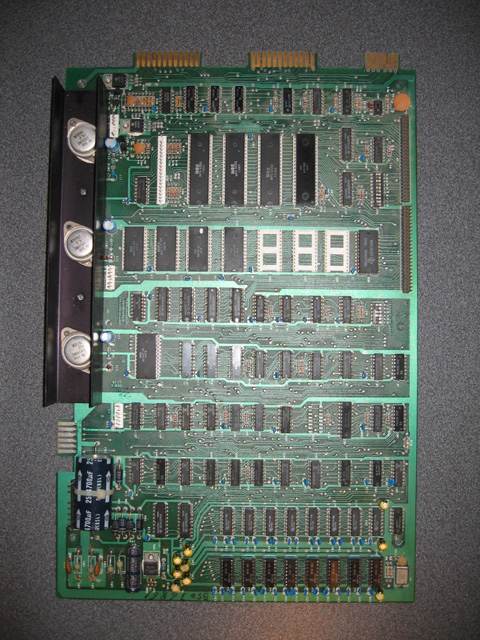
Photo 1. Pet 3230 board showing spare ROM slots
These ROM sockets are used for expansion purposes, but standard ROMS could be insterted into them, and the ROM contents PEEKed. By writing a small BASIC program, I could capture the contents of each test ROM I inserted there.
That was the solution to one problem.
2. Getting the ROM data from the PET into the PC
The next problem was to figure out how I was going to compare the real test ROM data (as read by the PET) with known good ROMS? Good ROM dumps were available on the Internet as binary files. But those files were on my PC. The test ROMS were on my PET. The only way my PET could communicate with the outside world was through the cassette tape, so how could I get them from the PET to the PC?
The solution lay in using an intermediary machine, in this case the Commodore 64. The C-64 COULD read sequential file data written to cassette by the PET. Furthermore this data could be transferred to a sequential file on disk, and the disk contents then transferred to the PC and made into a D64 disk image through the XE1541 cable --> parallel port solution.
Consequently, I wrote a program for both the PET which extracted the ROM data and wrote it to cassette and a further program for the C-64 which read the data from cassette and transferred it to disk. I could then use the process described above to get the test ROM data from PET to PC.
Another problem sorted although all these machines and cables made for a messy workbench as the photo below shows...

Photo 2 - Not much room left on the workbench
3. Testing the ROM data with known good ROM data
The final step was to use the VICE emulator . This fantastic emulator can mimic several vintage Commodore machines including the PET. Running in PET 3032 BASIC 2.0 mode (hence mirroring my real PET), it could be used to read in the ROM data from the virtual floppy drive (D64 image) and test it against the standard ROM data. How to get the latter into the emulator? Fortunately, the VICE emulator is so complete, it allows you to plug a virtual ROM (i.e. a binary file with ROM data) into a virtual spare expansion slot! It's then a simple matter to write a small BASIC program to read the ROM data from a sequential file on virtual disk and compare it to data read from the virtual expansion ROM socket (and the "known good" binary ROM file you have put there)!
This worked a treat! The photos below show a couple of screen shots of the program running in the VICE emulator window.
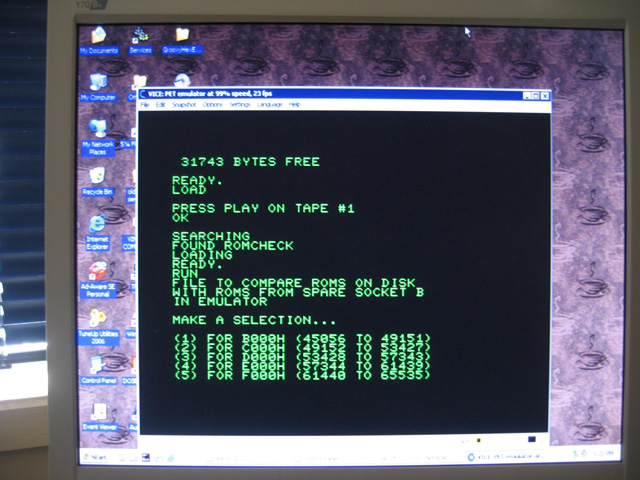
Photo 3. Starting the ROM comparison program
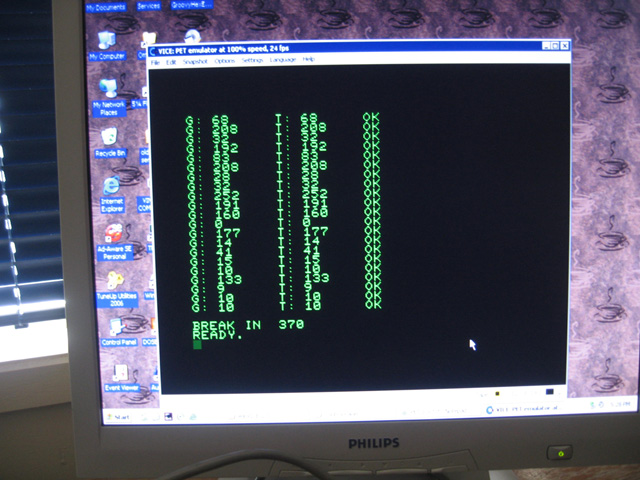
Photo 4. Comparing the data. G=good ROM, T=test ROM
Doing this I found that the F000H - FFFFH ROM (the kernel) was damaged (all bytes were a series of four identical numbers) and the B000H-BFFFH ROM (start of BASIC 4.0) was also a complete mismatch (hence faulty).
So, from the five suspect ROM chips on the original PET board, I now know that two are damaged, and exactly which ones they are.
It was quite a lot of work, but a satisfying investigation. If anyone wants to try a similar thing, the files I used for this project can be downloaded here. It strikes me that this method might be useful to compare ANY ROM with compatible pin configurations, not just PET ones.
Tez
6th February, 2009