Disk drive repairs on an Osborne 1
 Photo
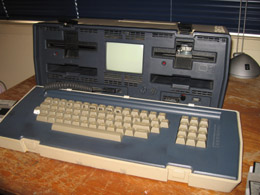
1. The Osborne 1a
Photo
1. The Osborne 1a
I love my Osborne 1a. It's a classic. The first luggable computer, heavy as hell, rugged as an army jeep and as ugly as sin!
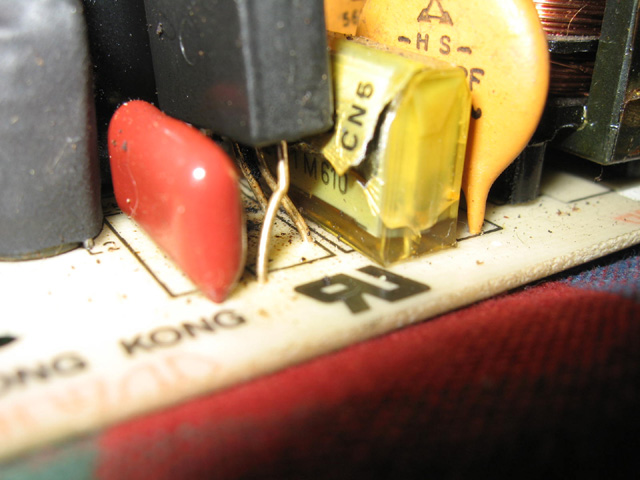
It doesn't like me though. It blew up when first obtained due to a faulty capacitor in the power supply. As soon as that was repaired it then threw a RAM chip!
After that was fixed it started to misbehave yet again! The B drive started to buzz and fizz at odd times. Not loudly, but you could hear these internal machinations from inside the disk slot. Occasionally, you'd hear the drive stepper motor move for no apparent reason. Furthermore, the B drive refused to format, read or write disks reliably and, most alarmingly of all, the machine would crash every 20-30 minutes or so. This was quite dramatic with the sudden appearance of the dreaded "garbage screen". At the same time, both disks would spin and the beeper would sometimes stay on! This crash was usually preceded by an extended period of buzzing (hash) where the screen would start to contract onto itself.
This was alarming to casual observers and was confirmation in their eyes that these old computers were indeed "a pile of junk" and I was more than mildly eccentric in wanting to collect and maintain them! Things had to be put right so this week, I dragged out the Ozzy for a look.
Disassembly
One of the hardest things about working on an Osborne 1 drive is getting to the drive. They are the LAST component you can get access too and you need to remove just about everything else. I decided to go the whole hog and remove everything from the case, and lay the unit out bare on the desk. This wasn't that easy. Wires which easily made the distance when packed into a case, were stretched to reach components that had a degree of separation.
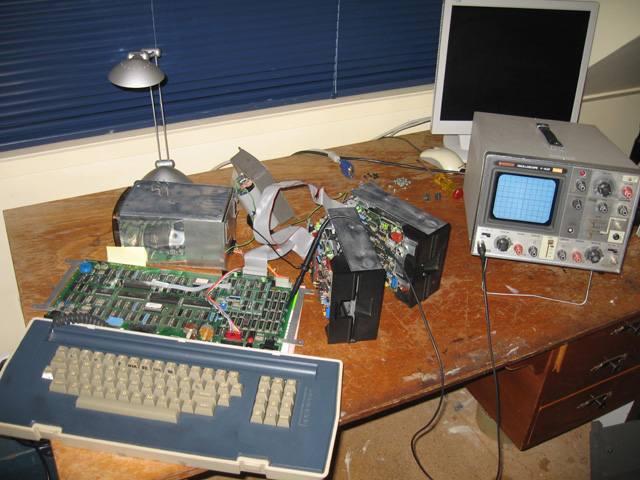
Photo 2. The very naked Osborne 1
Eventually, like a hospital patient on the operating table, the Osborne 1 was finally ready for examination.
Power Supply Unit check
The first thing I checked was the PSU with my borrowed oscilloscope. PSU capacitor problems causing an AC ripple are known to cause spontaneous crashes. This being one of the symptoms, it was worth checking out. I found a +ve lug on the circuit board, connected a probe, fixed the other one to earth and turned on the scope.
Results showed a good steady voltage and no sign of a ripple whatsoever. There was some AC hash way down at 0.01v but that can be regarded as harmless background noise. So the PSU checked out just fine. That's one likely cause eliminated
More clues
However, while I was doing this the drive started to hash again. I noticed every time it did this, the voltage flickered. At one stage there was a prolonged period of this hash and the voltage suddenly plummeted to 7v, then quickly climbed again. This was the cause of the system crashes! I figured whatever was happening on the drive was overloading the 12v supply.
As a check I disconnected the B drive and ran the machine just with the A drive. No problem. No hash noise, no voltage dips and no crashes.
Suspicion fell strongly on the B drive then as the cause of all the machine's woes. My focus turned to this unit.
Diagnosis of the B drive
I noticed the stepper motor would move from time to time of it's own accord, often when the hash noise was heard. The motor must have been receiving some current then, even if it shouldn't have been. Sure enough, a check on the voltage lead to the stepper motor showed pulses of current occasionally.
That shouldn't be happening.
As usual, I'd had some good help from my mates on the Vintage Computer Forums, in particular Chuck(c). He suggested I check the 75451 driver ICs, which fed current to the stepper motor when needed. Perhaps one of these was faulty?
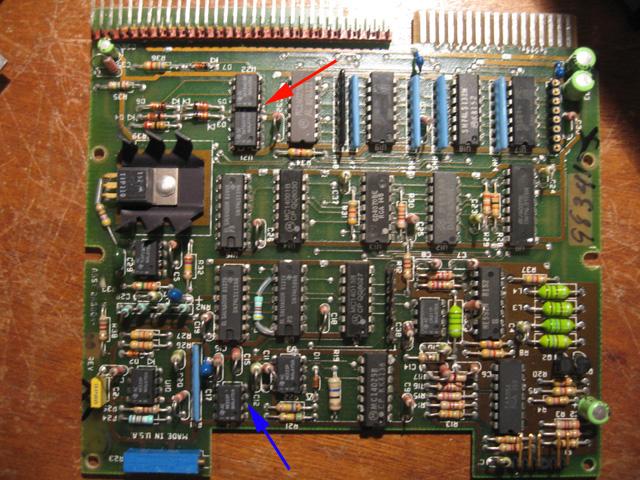
Photo 3. Pin 1 of the marked 75451
showed a High <---> Low flip-flop occasionally (Red Arrow).
Blue Arrow shows the NE555 the fault was eventually traced to (see below)
I checked this IC, and sure enough the output pin would sometimes "flip flop" between High (5v voltage) and Low (no voltage) even when the drive was at rest? This would correspond with the hash noise. However, such a symptom didn't mean the chip was bad. Logic chips are simply garbage in-garbage out. Was it getting bad data as it's INPUT? Further checking revealed this was indeed the case. The IC was ok, it was receiving intermittent flip-flops from the IC further up the circuit!
I worked my way slowly up through the line of ICs making up the circuit, following a trail of intermittent flip-flops in voltage. All of them were giving bad output. However, their logic was sound; they were giving bad output because their input was faulty. In fact, I went back through THREE ICs until I came upon an NE555 timer chip (see photo 3). This seemed to be the end of the trail as the input to this IC came not from another logic IC, but straight from the + 5v rail through a resistor.
Table 1. Pin values from the NE 555 IC (H<-->L means the voltage flip-flopped between High and Low erratically)
| Bad Drive | Good Drive |
| Pin 2 - TRG - H<-->L 3 - OUT - H<-->L 4 - RESET - H 5 - CONT 3.3 V 6 - THRES - H<-->L 7 - DISCH - H<-->L 8 - Vcc H |
Pin 2 - TRG - H 3 - OUT - L 4 - RESET - H 5 - CONT 3.3 6 - THRES - L 7 - DISCH - L 8 - Vcc - H |
Something was definitely not right with this circuit. A measurement on the NE555 pins of both the bad drive (B) and the good drive (A) revealed the data in Table 1 above.
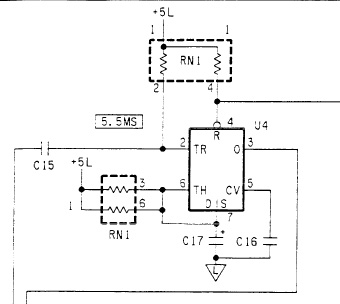 Figure
1. Part of the circuit diagram involving the NE555 IC
Figure
1. Part of the circuit diagram involving the NE555 IC
Pin 3 was the output line going to the downstream series of IC's and eventually to the stepper motor, and Pin 2 carried an input. The line on the other side of the capacitor C15 was itself an input line to another IC, not an output. It seemed then that either the NE555 itself was bad, the resistor RN1 was faulty or there was a dry solder joint on either. The latter diagnosis was the consensus on the Vintage Computer Forums and my own conclusion also.
At this point though, the symptoms in the drive suddenly stopped? After buzzing away for several nights, suddenly there was nothing?
Nothing? This was weird?? The machine stayed steady and so did the voltages yet I hadn't done anything? What was going on?
My theory is that the problem WAS a dry solder joint, and in probing around in this circuit with a multimeter applying pressure to a solder pad to take a reading I'd (temporarily anyway) fixed the problem!
Any problem fixed like that could just as easily un-fix itself. So as not to leave anything to chance, I flipped the board over and re-flowed the solder on all the joints in that circuit.
The board certainly seemed fixed. I gave it a good work out for two hours, copying data and formatting disks. No problem at all! The B disk drive worked as good as new.
Endurance test
There was some discussion on the forums of how you can think these problems are solved, only to reassemble the unit and the problem simply reappears. As a final check therefore, I decided to run the unit solidly for SEVEN HOURS non-stop. The longest time it had ever worked without rebooting was 30 minutes so if it lasted this long, it must really be ok.
I didn't want to do this endurance test in my computer shack where the machine wasn't being monitored so I set it up on the kitchen table one evening when we were at home, attached both drives and just let it run with a BASIC screensaver I wrote.
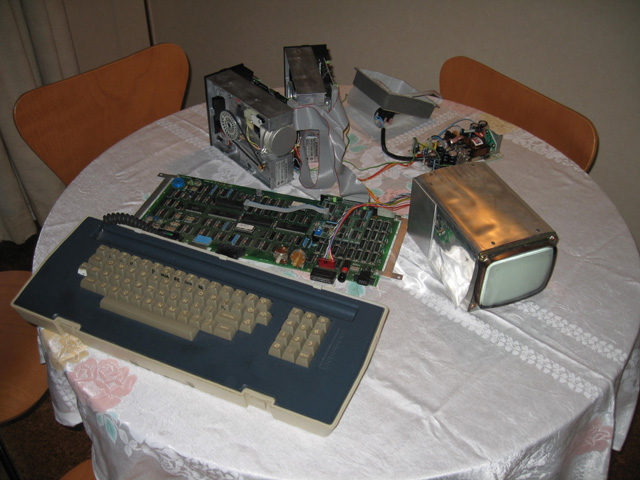
Photo 4. Osborne 1 during its endurance test
It passed with flying colours. Completely fixed.
So, this is one repair where I seem to have got to the bottom of it, but I'm not entirely sure EXACTLY which component had the solder short. It was certainly around the NE 555 circuit. Anyway, it's going fine now and hopefully will stay that way for the next 20 years!
Of course, the biggest challenge after fixing the Osborne 1, was to reassemble it! Good thing I took pictures as I took it apart. It is now happily back in it's case.
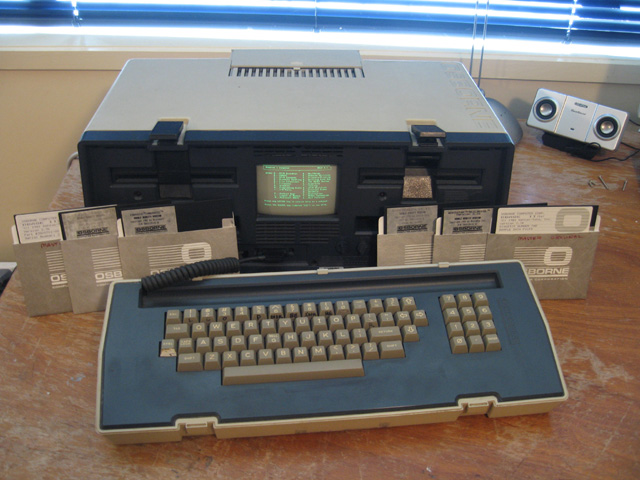
Photo 5. An Osborne 1a fully-clothed
Tez
4th April, 2009