Repairing two faulty Commodore PET mainboards - Part 2
Introduction
 This article continues the saga of two failed PET mainboards. Having repaired what was the spare board I now had a working PET (whew!).
Given that I only had one PET case there was no real need to fix the original board. Problem was, it annoyed the hell out me! Up till last week this board was working just fine. I'd just upgraded the ROM. All I'd done was to remove and insert the CPU and ROM ICs and now the PET was broken?! Not knowing what was wrong really bugged me!
I decided to persist.
Symptom
The symptom was something I hadn't seen before. The machine was frozen with just a few odd characters on the screen. The first two line of characters was always the same, while a third like contained anything from 2 to 20 junk characters (Figure 1).
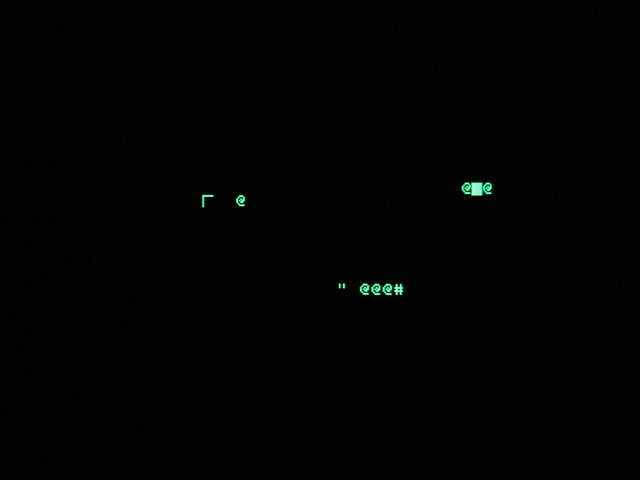
Figure 1. Mysterious symbols on the frozen PET VDU
Diagnosis
The symptom was the same no matter what ROM version was installed. Also the PET TESTER (see the previous article) showed CPU activity, and that there was enough good RAM to at least facilitate a boot up. Something else was making the machine hang? I swapped out the last 16K of RAM (which was socketed) but this made no difference. I also removed the 6520 and 6522 chips to isolate the problem. The machine should still boot even with these chips gone.
The previous day Philip Avery and I had checked out the CPU. It seemed ok, the only odd thing being that all the address lines were being held high. We weren't quite sure what this meant. Dave_m of the vintage computer forums deciphered this for us but knowing where the hang was occurring code-wise shed no light on the cause of the problem.
I had a strong hunch the issue had something to do with the sockets. After all the problem APPEARED only after I'd swapped out the CPU and ROMS. Following this lead I carefully and thoroughly checked all connectivity between the ROM sockets. It was fine. Well, no luck there.
Next was the CPU. I decided to start with an address line check. Using the circuit diagram I saw that these lines went to two 74LS244 buffer chips. Using a logic probe and a datasheet, I checked these ICs. Not only would this exercise ascertain if the address lines were getting through from the CPU, but it would also check that the logic chips were working properly.
The first 244 checked out. The second one at B3 checked out OK UNTIL I got to pin 11, which was an input pin for address line A15. No signal? Huh!?? This pin was neither high or low? Nothing? HMMMM...Was this the smoking gun? I checked connectivity between this pin and the top of the A15 pin (pin 25) on the CPU. No connectivity. Resting the probe on the side of pin 25 I gently pushed it towards the body of the CPU. Ah ha, connectivity. I relaxed the pressure. No connectivity. Applying the pressure again I switched the machine on. Whaddaya know, the BASIC splash screen.
Diagnosis! The CPU socket had failed at pin 25, the A15 line. With an address line down, why had the PET TESTER worked at all though? Well, it turns out this particular fault makes the PET TESTER look like it's working when actually it's not!
Repair
As with the first board I was reluctant to desolder a 40 pin socket. I fixed it the same way as that first repair, by adding a jumper from pin 25 to a pad on the board that went directly to pin 11 of the 244 IC at B3 (Figure 2).
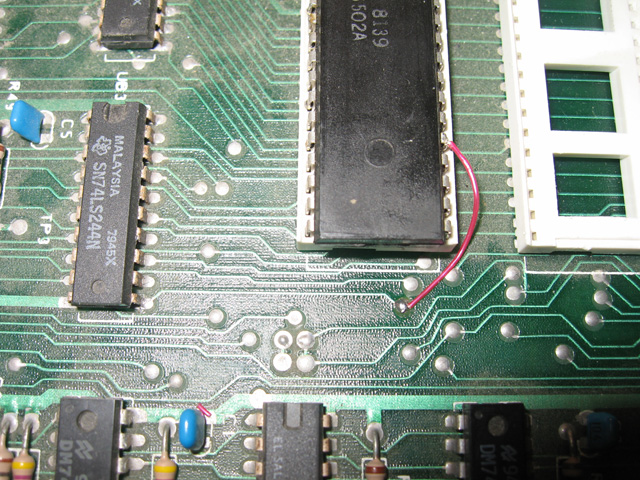
Figure 2. Jumper repair on A15 pin of the CPU
Both PET boards were now fully functional. I was finally content.

Figure 3. The repaired mainboard playing chess in the PET case
Reflections
Going by the number of broken PETs which appear on the Vintage Computer Forums, these machines seem prone to problems. Then again it could be just that some helpful folks inhabit the Commodore thread so people with issues feel comfortable posting there. However, the consensus seems to be that these weaknesses are:
- Faulty ROMS
- Faulty Sockets
- Faulty Video RAM (2114s)
One thing this exercise has taught me is the vulnerability of old sockets. They do fail. I had this same issue with my Kaypro II. Point is you can diagnosis issues like this with a simple multimeter...no scope is needed.
No matter what the machine, if things used to work and no longer do, and the only thing you've done is removed chips then reinserted them, suspect a socket (or a bent pin). An easy thing to fix and (relatively) easy to diagnose.
Tez
16th July, 2011
Updated 18th July, 2001 (added the PET TESTER link)